As someone who’s personally spent countless hours battling elusive water leaks, I’ve learned a thing or two about troubleshooting and repair. Whether it’s the incessant dripping sound in the dead of the night or the sudden realization of a wet spot on your ceiling, leaks can be a homeowner’s nightmare.
In this article, we’ll take an in-depth look at how to fix a leak yourself, save some money, and gain a bit more understanding of the plumbing that quietly functions within our walls.
Step 1: Identify the Source
The first thing you must do in this undertaking is to identify the source of the leak. In some cases, it’s as clear as day – perhaps you see water dripping from a pipe under the sink. However, in other situations, it might not be so straightforward. Water often travels along the pipes or seeps through the material before dripping, so the leak’s visible sign may be quite far from the source.
Spend some time examining the area where you’ve noticed the water. Look for wet spots, discolorations, or swelling in ceilings and walls. In some cases, you might need to gently touch the area to determine if it’s damp. Keep in mind, always be careful when dealing with water around electrical appliances or outlets.
Step 2: Shut off the Water
Once you’ve determined the source of the leak, it’s important to shut off the water supply. This is an essential step as it will prevent further damage and create a safer environment for you to work in.
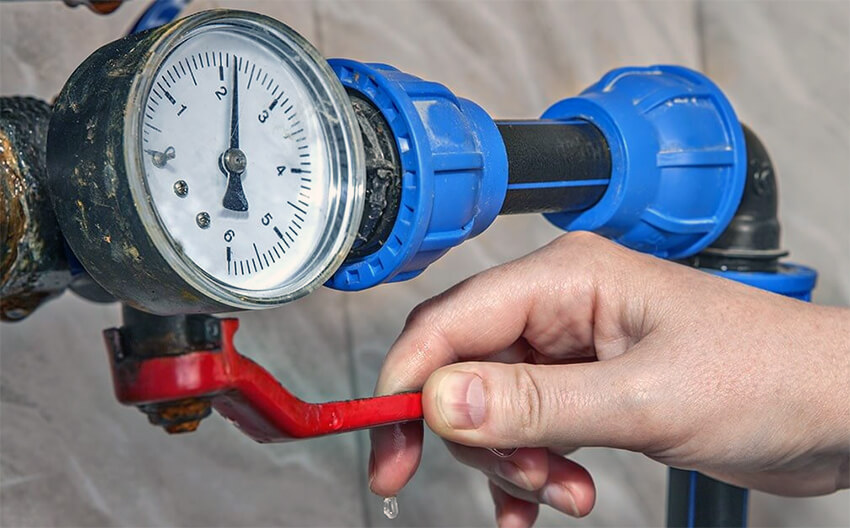
In most homes, you’ll find a main water shut-off valve, typically in the basement, garage, or outside near the street. Turn this valve clockwise (right) to stop the water flow. If you’re dealing with a leak from a specific appliance or fixture, like a sink or toilet, there might be an individual shut-off valve you can use instead.
Here is an example of how a main water shut-off valve might look:
Step 3: Assess the Damage
Before diving into any repair project, especially with plumbing, taking a careful and thorough assessment of the damage is crucial. This step goes beyond just identifying the leak. It’s about understanding the extent of the problem, any potential secondary issues that might have arisen due to the leak, and anticipating any potential challenges in the repair process.
Start with a close examination of the leak source. How big is it? Is it a mere drip, or is it gushing out? Sometimes, what appears as a small leak on the surface can be an indication of a much more significant issue lurking behind the scenes. For instance, if a pipe is dripping, the area around the leak can provide insight. Rust, mineral deposits, or swelling in wooden structures near the leak can indicate that the problem has been persistent for a while. This history can, in turn, give you a better understanding of how much work might be required to fix the issue.
Moreover, assessing the damage also means looking for secondary damages. Water has a way of traveling, and sometimes the damage isn’t just at the leak’s source. Check for signs of water damage in nearby areas. This can include water stains on walls or ceilings, warped wooden fixtures, or signs of mold growth. Even if you’re planning to fix the leak yourself, understanding the full scope of the damage ensures you’re adequately prepared and aware of the task ahead.
Step 4. Gather Materials
After assessing the damage and pinpointing the leak’s source, it’s time to gather the materials needed for the repair. While the exact materials will vary depending on the nature and location of the leak, here’s a list of common materials you might need, along with their individual uses:
- Replacement Washers: These are often the culprits behind a dripping faucet. Over time, washers can wear out or become damaged, causing water to leak around them. Ensuring you have a set of washers of various sizes can be handy.
- Sealants: A good-quality sealant can help close gaps or joins in pipes or fixtures. They come in different varieties, such as silicone or plumber’s putty. Sealants are particularly useful for minor leaks where a simple patch can resolve the issue.
- Plumber’s Tape (Teflon Tape): This is used for sealing and lubricating thread fittings on pipes. It’s especially useful when you’re attaching two threaded pipes together, ensuring a watertight seal.
- Replacement Pipes: In cases where a section of the pipe is corroded or damaged beyond repair, you might need to replace a section of it. Always ensure you choose the same type (PVC, copper, steel) as the existing pipe.
- Gaskets: These are seals that prevent water from leaking out at joints or connections. They are commonly used in areas like the base of toilet tanks or under faucet handles.
- O-Rings: These are small rubber rings used in many plumbing fixtures, especially faucets, to prevent leaks between moving parts.
- Pipe Clamps: For a temporary fix on slightly damaged pipes, a pipe clamp can be tightened around the leaky section to prevent water from escaping.
- Pipe Joint Compound: Also known as pipe dope, this is used to seal threaded joints in pipes. It ensures a watertight connection and can be used in conjunction with plumber’s tape for added assurance.
- Epoxy Putty: This is a versatile material that can be used to patch up small holes or cracks in pipes. Once mixed and applied, it hardens and forms a strong bond, sealing the leak.
If you’re unsure which specific plumbing materials you need, how big they should be, etc., there are affordable solutions that you can get from Amazon. For instance, KEZE Plumbing Assortment Kit covers all bases. It has washers of all sizes, gaskets, o-rings, screws, and so forth. There is no pipe in existence that the KEZE kit can’t effectively deal with. Click here to read over 1,000 positive reviews from other satisfied customers (myself included).

Step 5: Equip Yourself with the Right Tools
Having the right materials is half the battle; the other half is having the proper tools to work with those materials. While certain tools are essential for specific tasks, having a comprehensive toolkit will equip you for any leak-related challenge you might face. Here’s a breakdown of key tools and their purposes:
- Adjustable Wrench: This versatile tool is invaluable for loosening or tightening various sizes of nuts, bolts, and fittings found in plumbing systems.
- Pipe Cutter: If you need to replace a section of the pipe, a pipe cutter provides a clean and precise cut. There are different types designed for various pipes like PVC or copper.
- Plunger: A household essential, the plunger can clear minor blockages in sinks and toilets. These blockages, if left untreated, can often lead to leaks.
- Plumber’s Tape (Teflon Tape): Essential for creating watertight seals, it’s wrapped around pipe threads before joining them together to prevent leaks.
- Plumbing Snake (or Auger): For more stubborn blockages in drains or pipes, a plumbing snake can reach deeper into the system and clear obstructions that might cause water to back up and leak.
- Screwdriver Set: Many plumbing fixtures are held together or attached with screws. A comprehensive set of both flathead and Phillips screwdrivers can address a wide range of tasks.
- Pipe Wrench: Specifically designed for turning and holding pipes, its serrated jaws provide a firm grip, ensuring pipes don’t slip during repair or installation.
- Flashlight: Many plumbing systems are tucked away in dark corners, under sinks, or in basements. A powerful flashlight will help you clearly see the work area and spot leaks or damage.
- Bucket: While not a ‘tool’ in the traditional sense, having a bucket on hand can be useful for catching any dripping water while you work, preventing further damage or mess.
- Teflon Sealant (Pipe Dope): Often used in tandem with plumber’s tape, this sealant is applied to pipe threads to ensure a secure, leak-proof fit when joining two sections.
- Tape Measure: Precision is key when working with pipes, especially if you need to replace sections or install new fixtures. A tape measure ensures that you make accurate cuts and adjustments.
I know that this long list of tools might seem intimidating, but you can get all or almost all of them in one set that will serve you for years to come. Personally, I work with the highly rated jar-owl 107-Piece Tool Set. It helps me with plumbing, and also with a wide range of other home repairs. It comes with adjustable wrenches, tape measure, cutter, saw, screwdrivers, electric tape, pliers, screws, cordless drill, multiple drill bits, and more! I absolutely love it! Click here to see the full list of items within this versatile tool set.

Step 6: Make the Repair
Alright, let’s dive into the nitty-gritty of using the tools and materials we’ve assembled. Using them correctly is the key to a lasting repair.
1. Using Sealants and Putty
Sealants: If the leak is coming from a joint or a minor crack, sealants can be your first line of defense. Ensure the area is dry. Apply the sealant over the leak, ensuring it covers the area completely. Use a spatula or your finger (wearing gloves) to smooth it out. Give it ample time to dry based on the product’s recommendations.
Epoxy Putty: For minor holes or cracks in pipes, knead the putty until it’s a uniform color, then apply it over the problem area. Press it down firmly, ensuring it adheres to the pipe and covers the leak entirely.
2. Dealing with Faucet Leaks
Replacement Washers and O-Rings: Faucets often leak due to worn-out washers or O-rings. After disassembling the faucet handle using a screwdriver, locate the faulty washer or O-ring. Replace it with a new one and then reassemble the faucet.
3. Patching Pipe Leaks
Pipe Clamps: For a quick fix on slightly damaged pipes, fit a pipe clamp around the leaky section. Tighten it until it’s firmly holding the pipe and preventing the water from escaping.
Here is a great video guide on fixing pipe leaks:
4. Replacing Sections of Pipe
Pipe Cutter: If a pipe section is damaged beyond a simple patch, it might need replacement. Use a pipe cutter to remove the damaged section cleanly. Measure and cut a new piece of the same material (PVC, copper, etc.) to fit.
Plumber’s Tape & Pipe Joint Compound: Before joining the new section to the existing pipe, apply plumber’s tape or pipe joint compound on the threads for a watertight seal.
5. Using Plumber’s Tape and Joint Compound
Plumber’s Tape (Teflon Tape): When connecting two threaded pipe sections, wrap plumber’s tape around the male threads. This not only ensures a tighter fit but also helps prevent leaks.
Pipe Joint Compound (Pipe Dope): Apply this compound over the plumber’s tape for added assurance, ensuring a leak-proof fit.
6. Addressing Toilet and Fixture Leaks
Gaskets: If a toilet tank is leaking, it might be due to a worn-out gasket at the tank’s base. Turn off the water supply to the toilet, flush to empty the tank, and then replace the gasket.
Remember, while using these tools and materials, precision and patience are vital. Ensure each step is done meticulously. Even if the process takes time, a careful and well-executed repair will save you future headaches. After finishing, it’s always a good practice to test the repair, ensuring that no water is leaking from the fixed area.
I have written a separate section that addresses specific leaks and the ways to fix them, which you can read below.
Step 7: Test Your Repair
After all your hard work, it’s essential to ensure that the repair holds up under real-world conditions. This step is vital because sometimes, despite our best efforts, there might still be underlying issues or overlooked problems that could lead to future leaks or damage.
Confirm the Immediate Success
Start by visually inspecting the repaired area. Check for any obvious gaps, especially if sealants or putties were used. The area should look seamless and well-secured. Turn the water supply back on, but do so gradually. This slow reintroduction of water pressure allows you to monitor how the repair handles the stress. If it’s a faucet or valve, operate it multiple times, watching closely for any sign of water escaping. For pipes, let the water run through them for several minutes, ensuring that there are no drips or wet spots forming around the repaired section.
Long-Term Monitoring
A successful immediate test is a good sign, but it’s equally important to monitor the repair over a more extended period. Sometimes, issues might not be apparent right away, especially if they’re minor. Over the next few days, regularly inspect the area, checking for any moisture, drips, or signs of failure. Keep an absorbent towel or tray beneath the repaired area, if possible. This will not only catch any unexpected drips but will also make it evident if even a tiny amount of water is leaking. If after several days you see no signs of water, you can be reasonably confident in the success of your repair.
Remember: The goal is a long-lasting solution. By thoroughly testing and monitoring your repair, you’re ensuring the longevity and functionality of your plumbing system, giving yourself and your home the best protection against future leaks.
Common Leaks and How to Fix Them
While every leak is unique, some leaks are more common than others. Understanding these can prepare you for most situations you may encounter.
| Type of Leak | Description | How to Fix |
|---|---|---|
| Sealant and putty leaks | Leaks coming from joints or minor cracks. | Apply the sealant or putty over the affected area. Ensure full coverage and smooth it out. |
| Faucet leaks | Often result from worn-out washers or O-rings inside the faucet mechanism. | Disassemble the faucet handle, locate the faulty washer or O-ring, and replace it with a new one. |
| Pipe leaks | Minor damage on pipes, resulting in leakage. | For quick fixes, use a pipe clamp tightened around the leaky section. For severe damage, replace the affected section using a pipe cutter and rejoin using plumber’s tape and joint compound. |
| Toilet and fixture leaks | Often due to wear and tear, especially in the gaskets. | Turn off the water supply, empty the tank or fixture, and replace the worn-out part, such as a gasket. |
| Leaks in washing machine hoses | Often caused by worn-out hoses or loose connections behind the washing machine. | Check both the hot and cold water hoses. Tighten connections if loose or replace the hose if it shows signs of wear and tear or visible damage. |
| Leaky garden hose spigots | Leaks typically occur at the connection point between the hose and the spigot or from the spigot itself. | First, ensure the hose connection is tight. If the spigot is dripping, it may need a new washer or require replacement. Wrapping the threads with plumber’s tape can also help seal minor leaks at the connection. |
Prevention is Better Than Cure
While we’ve armed you with knowledge on how to fix common leaks, preventing leaks from occurring in the first place is the best solution. Regular maintenance can help you identify potential issues before they become leaks.

This could include routinely checking the areas under sinks, around toilets, and in basements for any signs of moisture or mildew. Pay attention to your water bill; an unexplained increase could be a sign of a hidden leak. Consider installing water leak detectors, particularly in hard-to-reach areas, to catch leaks before they cause damage.
When to Call a Professional Plumber
While the DIY approach can save you money and offer a sense of accomplishment, there are times when calling a professional plumber is the best course of action. Here are a few scenarios where you might want to call in the pros:
- Major leaks or flooding: If you have a significant leak or flooding in your home, it’s best to call a professional plumber immediately. They have the experience and equipment to deal with major issues.
- Sewage leaks: Sewage leaks or backups pose serious health risks and should always be handled by professionals.
- Unknown source of leak: If you’ve done your best to find the source of the leak but are coming up short, a plumber can help. They have specialized tools and experience to locate and fix hard-to-find leaks.
Choosing a professional plumber requires some research. Look for licensed, insured professionals with good reviews. Don’t hesitate to ask for references or to ask about their experience with your specific issue.
In Conclusion
Fixing a leak can be a straightforward process with the right knowledge and tools. While certain situations will necessitate a professional plumber, many common leaks can be addressed with a bit of DIY know-how. Not only will you save money, but you will also contribute to a more sustainable future.
So, the next time you hear the drip, drip, drip of a leak, remember – you’ve got this!