They say our homes, like us, show their age over time. In the case of our houses, these signs often come in the form of hairline cracks snaking their way across walls or down our driveways. While these fissures may seem superficial and harmless, if left unaddressed, they can lead to significant problems.
But don’t worry, I’ve got your back! As a teenager, I spent a whole summer learning how to patch up walls and sidewalks, a skill I never thought I’d use as much as I do now. And today, I’ll guide you through this exact process, sharing the lessons I’ve learned over the years. Buckle up as we dive into this step-by-step guide on how to fix cracks.
How to Fix Cracks: Step by Step
1. Assess the Damage
Before you charge headfirst into repair mode, take a moment to inspect the damage. Determine the type of crack you’re dealing with, is it on a wall, ceiling, or concrete floor? Are they just hairline fractures or deep crevices? A small, thin crack can usually be fixed with some filler and paint, but larger, deeper cracks may need more attention.
Look for signs of a deeper issue such as water damage or structural weakness, which could require professional intervention. Remember, just like people, every crack has a story. Understanding its origins will help you find the most effective treatment.
2. Gather Your Supplies
For smaller cracks, you’ll need a basic set of supplies: a utility knife, a scraper or wire brush, a damp cloth, filler compound (the type depends on the surface), and sandpaper. If you’re dealing with a larger crack on a wall or ceiling, you may also need a strip of fiberglass tape to provide extra support.

If the crack is in concrete, such as a driveway or sidewalk, you’ll need a cold chisel and a mallet to widen the crack before filling it, and a concrete patch compound. Always remember to wear safety glasses and gloves to protect yourself during the process.
You can also get a repair kit that includes everything you need to fix cracks, such as the highly recommended Boncart Store’s Drywall Repair Kit. This easy-to-use solution quickly fixes cracks and holes in your walls, leaving them looking as good as new. It’s the ideal blend of efficiency, effectiveness, and affordability (currently available at 14% discount). Click here to read over 2,400 positive reviews for this wonderful repair kit.
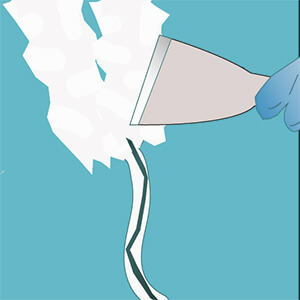
3. Prep the Area
Once you’ve assembled your tools, start by using your utility knife to cut away any loose material around the crack. Next, use a scraper or wire brush to remove any further debris. For a cleaner repair, you can slightly widen the crack with your utility knife, forming a ‘V’ shape. This shape will provide a better grip for the filler.

After you’re done, wipe the area with a damp cloth to ensure a clean surface for the filler to adhere to. For concrete cracks, use your cold chisel and mallet to widen the crack, then brush away any loose particles.
4. Apply the Filler
Now comes the filling process.
- For small wall cracks, apply the filler using a putty knife, pressing it into the crack and smoothing the surface.
- For larger cracks, apply a strip of fiberglass tape over the crack before adding a layer of joint compound over the tape. Smooth the compound with your putty knife and let it dry.
- For concrete cracks, fill them with your patch compound using a trowel, making sure the patch is level with the surface.
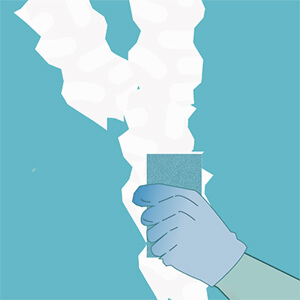
5. Sand and Paint the Surface
After the filler or compound has dried (this can take up to 24 hours), sand the surface until it’s smooth and level with the rest of the wall or floor. Finally, paint over the patched area to match the rest of the surface. And voila, you have a repaired crack! Remember, patience is the key in this final stage. Don’t rush the drying and sanding process as it can determine the quality of your repair.
Crack repair is more than just a superficial fix. It’s about preserving the integrity of your home and ensuring a safe, healthy living environment for you and your family. These steps I’ve outlined may seem a little daunting at first, but trust me, with a bit of patience and a steady hand, you’ll master them in no time.
For a demonstration on how to fix cracks, check out this video from Billshowto:
Now that we’ve conquered the basics of crack repair, let’s delve into some additional information that can help you further understand and manage cracks in your home.
Understanding the Causes of Cracks
To prevent cracks from reoccurring, it’s vital to know why they happen in the first place. Often, it’s a combination of several factors:
- Thermal Expansion and Contraction: Just like most materials, your home’s walls and concrete floors expand when heated and contract when cooled. This constant cycle can lead to cracks over time, especially if the temperature fluctuations are severe.
- Settling: Houses, particularly new ones, tend to settle over time due to the ground compacting under the structure’s weight. This settling can lead to cracking, especially in the first few years.
- Poor Construction: If the builder skimped on materials or didn’t allow enough time for the foundation to cure before building on top of it, your home might be prone to cracking.
- Water Damage: Water can weaken structures over time. If your home doesn’t have proper drainage or if you live in a flood-prone area, water damage could be the cause of your cracks.
- Seismic Activity: While not common in all areas, seismic activity can lead to cracks in walls, floors, and foundations.
Deciding When to Call a Professional
Even the most proficient DIY enthusiast needs to call in the experts occasionally. Here are a few situations where it’s best to leave crack repair to professionals:
- Wide Cracks: Cracks wider than 1/8-inch usually indicate a serious issue and should be inspected by a professional.
- Stair-Step Cracks: These cracks usually occur in brick or concrete block walls and might be a sign of significant foundation shifting.
- Sagging Ceilings: If a crack in your wall or ceiling is accompanied by sagging, it could be a sign of a severe structural issue, such as roof damage or foundation failure.
- Repeated Cracks: If a crack keeps reappearing after you’ve repaired it, it’s a sign of a persistent issue that needs professional attention.
- Personal Comfort: If at any point, you feel uncomfortable or unsure about a repair, it’s best to call a professional. DIY is great, but safety should always be your priority.
Proactive Measures to Prevent Cracks
Preventing cracks before they occur is always the best approach. Here are some preventative measures you can take:
- Regular Inspections: Make it a habit to inspect your home regularly for signs of cracks. Early detection can prevent minor cracks from turning into major problems.
- Proper Drainage: Ensure water drains away from your home to prevent soil erosion and water damage, which can lead to cracks.
- Control Temperature Fluctuations: While you can’t control the weather, you can ensure your home’s temperature doesn’t fluctuate dramatically. Using insulation and maintaining a steady indoor temperature can help.
- Hire Reputable Builders: If you’re building a home, hiring a reputable builder can prevent many problems, including cracks, down the line.
Common Mistakes to Avoid When Repairing Cracks
Repairing cracks isn’t overly complicated, but it’s easy to make mistakes. Here are some common ones to avoid:
- Not Preparing the Crack Properly: Don’t rush the preparation process. Ensure the crack and surrounding area are clean and free of debris before applying the filler.
- Using the Wrong Materials: Not all fillers and sealants are created equal. Using the wrong type can lead to a poor repair or even further damage. For instance, using a non-flexible filler for a crack that is prone to expanding and contracting with temperature changes can cause the filler to crack.
- Skipping Sanding: After the filler has dried, it’s essential to sand it down to create a smooth, level surface. Skipping this step can result in a noticeable, uneven repair.
- Ignoring the Root Cause: Remember, cracks are often a symptom of an underlying issue. Simply patching them without addressing the root cause will likely lead to the crack reappearing in the future.
- Disregarding Safety Measures: When fixing a crack, remember to protect yourself. Wear safety glasses to protect your eyes from debris and gloves to safeguard your hands.
By avoiding these common mistakes, you’ll increase the likelihood of a successful, long-lasting crack repair.
In Conclusion
Learning to fix cracks in your home can seem intimidating at first, but it’s a skill worth acquiring. Not only can it save you time and money, but it can also give you a sense of accomplishment and ownership over your living space.
Remember, our homes are a reflection of us, and just like we tend to our own well-being, we need to care for our homes, ensuring they remain strong and comfortable, standing the test of time. So the next time you see a pesky crack creeping up your wall or across your driveway, take a deep breath, gather your tools, and face it head-on.
You’ve got this!