
Ever looked up at your ceiling and spotted a hairline fracture that wasn’t there before? If so, you’re not alone. Ceilings aren’t impervious to the hands of time and, like many other parts of our homes, can fall victim to wear and tear. Cracks in your ceiling can be unsightly, but they’re often more of a cosmetic issue than anything else. However, in some instances, ceiling cracks could be a sign of serious structural problems, which brings us to the question, “Ceiling cracks: when to worry?”
First off, let me reassure you, not every crack in your ceiling signifies impending doom. Like wrinkles on an aging face, these are often merely indications of a house that has seen life. But, like those wrinkles, some tell a story of stress and strain that may require more attention. In this article, we’ll take an in-depth look at ceiling cracks: the types, causes, potential issues they can raise, when to worry, and a step-by-step guide to tackle them.
1. Identify the Type of Crack
Firstly, it’s crucial to identify the type of crack appearing on your ceiling. Understanding the different types of cracks can help you determine the severity of the situation and whether it’s a DIY repair or time to call in the professionals.
Hairline Cracks
Hairline cracks are thin, superficial cracks that usually present no cause for alarm. They are commonly found in plaster ceilings and are typically the result of normal house settling or temperature changes. The stress of these conditions can cause the plaster to crack slightly, particularly around doors and windows or along the ceiling’s edges.
How to handle hairline cracks: While these cracks are generally not a problem, ignoring them completely isn’t the best approach either. Even minor ceiling cracks can expand over time if not properly addressed, leading to more significant issues down the line. This is why regular inspection and routine maintenance of these cracks are advisable.
Spiderweb Cracks
Next, let’s discuss spiderweb cracks. These small, fine cracks spread out from a central point, mimicking the appearance of a spiderweb. Like hairline cracks, they are usually a result of normal house settling or minor shrinkage in the drywall or plaster.
How to handle spiderweb cracks: Spiderweb cracks, while visually unappealing, are often not a cause for major concern. However, they should be monitored closely to ensure they don’t evolve into a more serious issue. Routine painting or plastering can help mask these minor defects and keep your ceiling looking pristine.
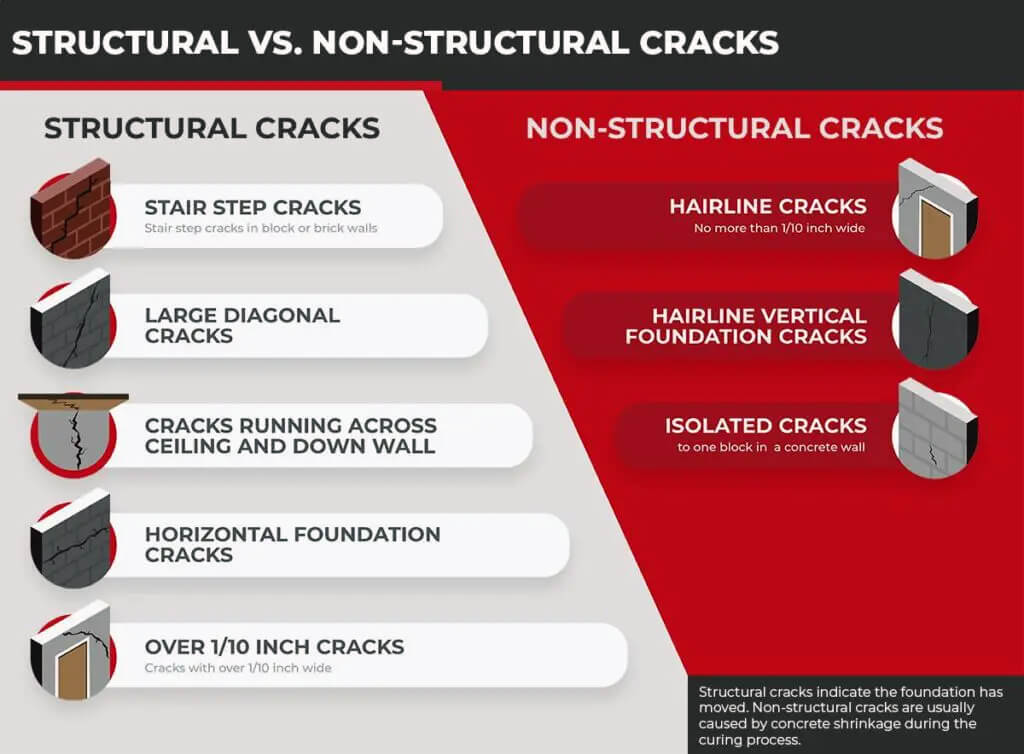
Structural Cracks
Structural cracks in ceilings can be a cause for concern as they could signal serious issues with your home’s foundation or framing. These types of cracks are typically wider than 1/8 inch, run across the length of the ceiling, and may continue along the walls. They can form patterns, such as a stair-step or map-like pattern, and may be accompanied by other symptoms such as sticking doors or windows, sagging or sloping floors, and visible cracks in the home’s exterior.
Structural cracks often occur due to significant shifts in the home’s foundation, which can be caused by various factors such as soil movement beneath the foundation, improper construction methods, or even seismic activity. These cracks can compromise the structural integrity of your home if left untreated.
How to handle structural cracks: It’s essential to address structural cracks promptly. While minor ones can sometimes be repaired with patches or sealants, major structural cracks may require more extensive repairs, including underpinning or shoring up the home’s foundation, which should be carried out by professionals. If you notice any signs of structural cracks, I strongly recommend seeking advice from a structural engineer or professional contractor to assess the severity of the situation and suggest an appropriate course of action.
2. Assess the Cause of the Crack
Now that you’ve identified the type of crack, it’s time to dig a little deeper and try to understand the cause.
Natural Aging and House Settling
Houses, much like people, age. Over time, structures naturally settle, and materials contract and expand due to changes in humidity and temperature. These factors can cause cosmetic cracks, typically hairline or spiderweb in nature, in your ceiling.
Don’t let these small cracks spoil your peace of mind. They’re usually just the house’s way of acclimatizing to its surroundings. However, it’s good practice to keep an eye on these cracks to ensure they don’t grow larger.
Water Damage
One of the more severe causes of ceiling cracks is water damage. Water leaks from a faulty roof or an upstairs bathroom can cause bulges or discoloration along with cracks in the ceiling. In these cases, the cause of the crack isn’t simply cosmetic but a sign of an underlying plumbing or roofing issue that needs to be addressed promptly.
If you see a crack with signs of water damage, it’s time to call in the professionals. Left untreated, water damage can lead to mold growth and severe structural weakening, which can be a health hazard and compromise the integrity of your house.
Structural Issues
If the crack in your ceiling is large, follows a pattern, or is accompanied by other signs such as cracks in the walls, jamming doors, or uneven floors, it might be a symptom of a serious structural issue. Cracks that run across the length of the ceiling and continue down a wall could signify damage to the foundation or load-bearing walls.
Structural problems like these warrant immediate professional attention. Never ignore these signs as they could lead to catastrophic damage if left unattended.
3. Carry Out Basic Repairs
Now that you’ve identified the type of crack and its possible cause, you might be wondering, what next? If you’re dealing with minor, cosmetic ceiling cracks, you can probably handle the repairs yourself. Here’s a simple step-by-step guide on how to repair minor ceiling cracks.
A) Gather Your Materials
Before you begin, gather your materials. Ensure you have everything on hand before you start the repair process. Proper preparation makes the task smoother and more efficient.

For this task, you’ll need a utility knife, a drywall joint compound, joint tape (if the crack is large), a joint knife, primer, and paint to match your ceiling. Alternatively, you can get Red Devil 0549 ONETIME Lightweight Spackling Patch-A-Wall Kit, which is a great option for beginners. This all-in-one kit featured puty knife, spackling, wall patch, and sandpaper. The kit is not only a good and affordable investment for this task but can also come in handy for any future crack-fixing work around your home.
B) Prepare the Crack
Begin by using the utility knife to slightly widen the crack. This might seem counter-intuitive, but it will help the joint compound adhere better, making for a more durable repair. Remove any loose debris and dust in and around the crack to ensure a clean workspace.
Preparation is key here. A thoroughly cleaned and prepped crack will lead to a much smoother and more effective repair.
C) Apply the Joint Compound
Using the joint knife, apply the drywall joint compound into the crack. If the crack is wide, you may need to use joint tape before applying the compound. Make sure the compound is evenly spread and smooth it out as much as possible.
Give the compound enough time to dry fully. This might take anywhere from a few hours to a full day, depending on the compound used and the size of the crack.
D) Sand and Paint
After the joint compound has completely dried, lightly sand the area to smooth out any unevenness. Wipe away the dust created from sanding before moving to the next step.

Finally, apply a primer to the area. Once the primer dries, paint over it to match the rest of your ceiling. I recommend using Rust-Oleum 1990502 Painters Touch Latex in Flat White. Its smooth, durable finish helps conceal repairs, leaving your ceiling looking as good as new. Plus, its excellent coverage saves you time by reducing the number of coats needed.
Voila! Your ceiling should now be free of cracks.
4. Maintain and Monitor
Aside from repairs, maintaining your home is equally crucial in avoiding ceiling cracks. Make it a habit to periodically check your ceiling for any new cracks or changes to existing ones. Take note of their size, direction, and rate of growth, if any.
Monitoring the condition of your ceiling not only helps in early detection of problems but also aids in maintaining the aesthetic appeal of your home. It’s a simple measure that can save you from potential headaches in the future.
When to Call a Professional
Despite our best DIY efforts, there are times when it’s necessary to call in the professionals. If you’ve noticed that the crack in your ceiling is growing rapidly, if there are multiple cracks, or if the cracks are accompanied by other warning signs of structural damage, it’s time to get professional help.
Similarly, if water damage is causing the ceiling cracks, it’s imperative to address the root of the problem rather than merely patching up the symptom. In these cases, a professional can provide an accurate assessment of the issue and advise on the best course of action.
Remember, when it comes to potential structural damage in your home, it’s always better to be safe than sorry. Even if it turns out to be a minor issue, getting a professional opinion can provide you with peace of mind.
In conclusion, while ceiling cracks are often a common and minor issue, they can sometimes be a symptom of more severe problems. It’s important to keep an eye on them, understand what causes them, and know when it’s time to worry. With the knowledge you’ve gained from this article, you should be well equipped to address any cracks that might appear in your ceiling. So, the next time you spot a crack, don’t panic! Assess the situation, understand the potential causes, carry out basic repairs if suitable, and don’t hesitate to call a professional if needed.
Preventive Measures
Implementing certain preventive measures can also go a long way in preventing ceiling cracks. For instance, ensure good insulation in your home to minimize temperature fluctuations that can lead to cracks. Regularly check and repair your roofing to avoid any water leakage that can damage your ceiling.
Remember, prevention is always better than cure. By taking these proactive steps, you can help protect your ceiling and, by extension, your home from damage.
For visual demonstration of how you can fix ceiling cracks, here is an excellent video from Billshowto:
Life with Ceiling Cracks: A Final Thought
Life with ceiling cracks can be a bit of a hassle, but it’s a common part of homeownership. Most of us will deal with a crack or two during our time in a home. The important part is knowing how to respond and then how to fix cracks.
The primary take-away is not to panic when you see a crack. Many times, they’re simply a sign of your house settling or responding to temperature changes. But, it’s also important to know when to worry. Larger cracks, or those accompanied by other signs of structural damage, require immediate professional attention.
And of course, the best method to deal with ceiling cracks is to prevent them from happening in the first place. Regular maintenance, routine inspections, and immediate repairs of minor damages can keep your ceiling crack-free.
In the end, our homes, like us, aren’t perfect. They age, they settle, and sometimes, they crack under pressure. And that’s okay. As we’ve seen, there are ways to manage and even embrace the cracks. By understanding what causes them, knowing when to worry, and learning how to repair them, we can coexist with these blemishes and still love our homes, cracks and all.
So, here’s to living with ceiling cracks: may we meet them with understanding, treat them with care, and, when necessary, call in the experts. After all, our homes are our sanctuaries, and they deserve no less.