
There’s something profoundly satisfying about immersing yourself in a DIY project. Whether you’re a seasoned professional or a weekend hobbyist, painting a wall can be a delightful task, one that gives you the chance to breathe new life into a tired room and stamp your personality on your space.
In this detailed guide, I’ll walk you through the steps of how to paint a wall, sharing some of my experiences, and offering tips that will help you achieve a professional-looking result.
How to Paint a Wall
Step 1: Choose the Right Tools
First of all, painting requires a variety of tools, each with a specific purpose. Understanding the right tool for each part of the job can greatly improve the outcome of your painting project.
Paint Brushes
Paint brushes are versatile tools used for both large surfaces and detailed work. Brushes with natural bristles are best suited for oil-based paints, while synthetic bristles are ideal for water-based paints. The width and shape of the brush will depend on the area you are painting; smaller brushes are used for intricate details, while larger ones cover bigger surfaces more quickly.
Rollers
Rollers are designed to paint large, flat surfaces quickly and efficiently. The roller’s material and nap length (thickness) can be selected based on the texture of your wall and the type of paint you’re using. A short nap roller is suitable for smooth surfaces, while a longer nap roller is better for textured surfaces.
Paint Tray
The paint tray holds the paint for your roller, allowing you to easily load the paint evenly. Look for trays with a slope or ridged area to help distribute the paint uniformly across the roller.
Painter’s Tape
Painter’s tape helps to protect areas that you don’t want to paint, like trim and electrical outlets. Choose a tape that suits the surface you’re working on, and ensure that it’s removed promptly after painting to prevent residue or peeling.
Drop Cloths
Drop cloths protect floors and furniture from paint splatters and spills. Cloth drop cloths are reusable and less slippery than plastic, while plastic drop cloths are disposable and waterproof.
If you don’t wish to buy all these items separately, you can get a wall painting kit like Voomey 17 Piece Set. It costs next to nothing, and comes with everything included – rollers, paint tray, tape, brush, gloves, paint roller frame, and more. Every item in this set is high-quality and helps you get the job done. I’ve personally got it before I started painting my walls, and it saved me the hassle of finding the right tools one by one. Click here to check the current price and read what others are saying about this set.

Step 2: Select the Paint
Choosing the right paint is an essential part of painting a wall. Your choice will be influenced by factors such as the room’s function, the desired appearance, and the existing surface conditions.
Paint Type
Water-based (latex) paints are popular for interior walls due to their quick drying times and easy cleanup. Oil-based paints, though more durable, take longer to dry and require special thinners for cleanup. Water-based paints are generally more environmentally friendly and emit fewer odors.
Color Selection
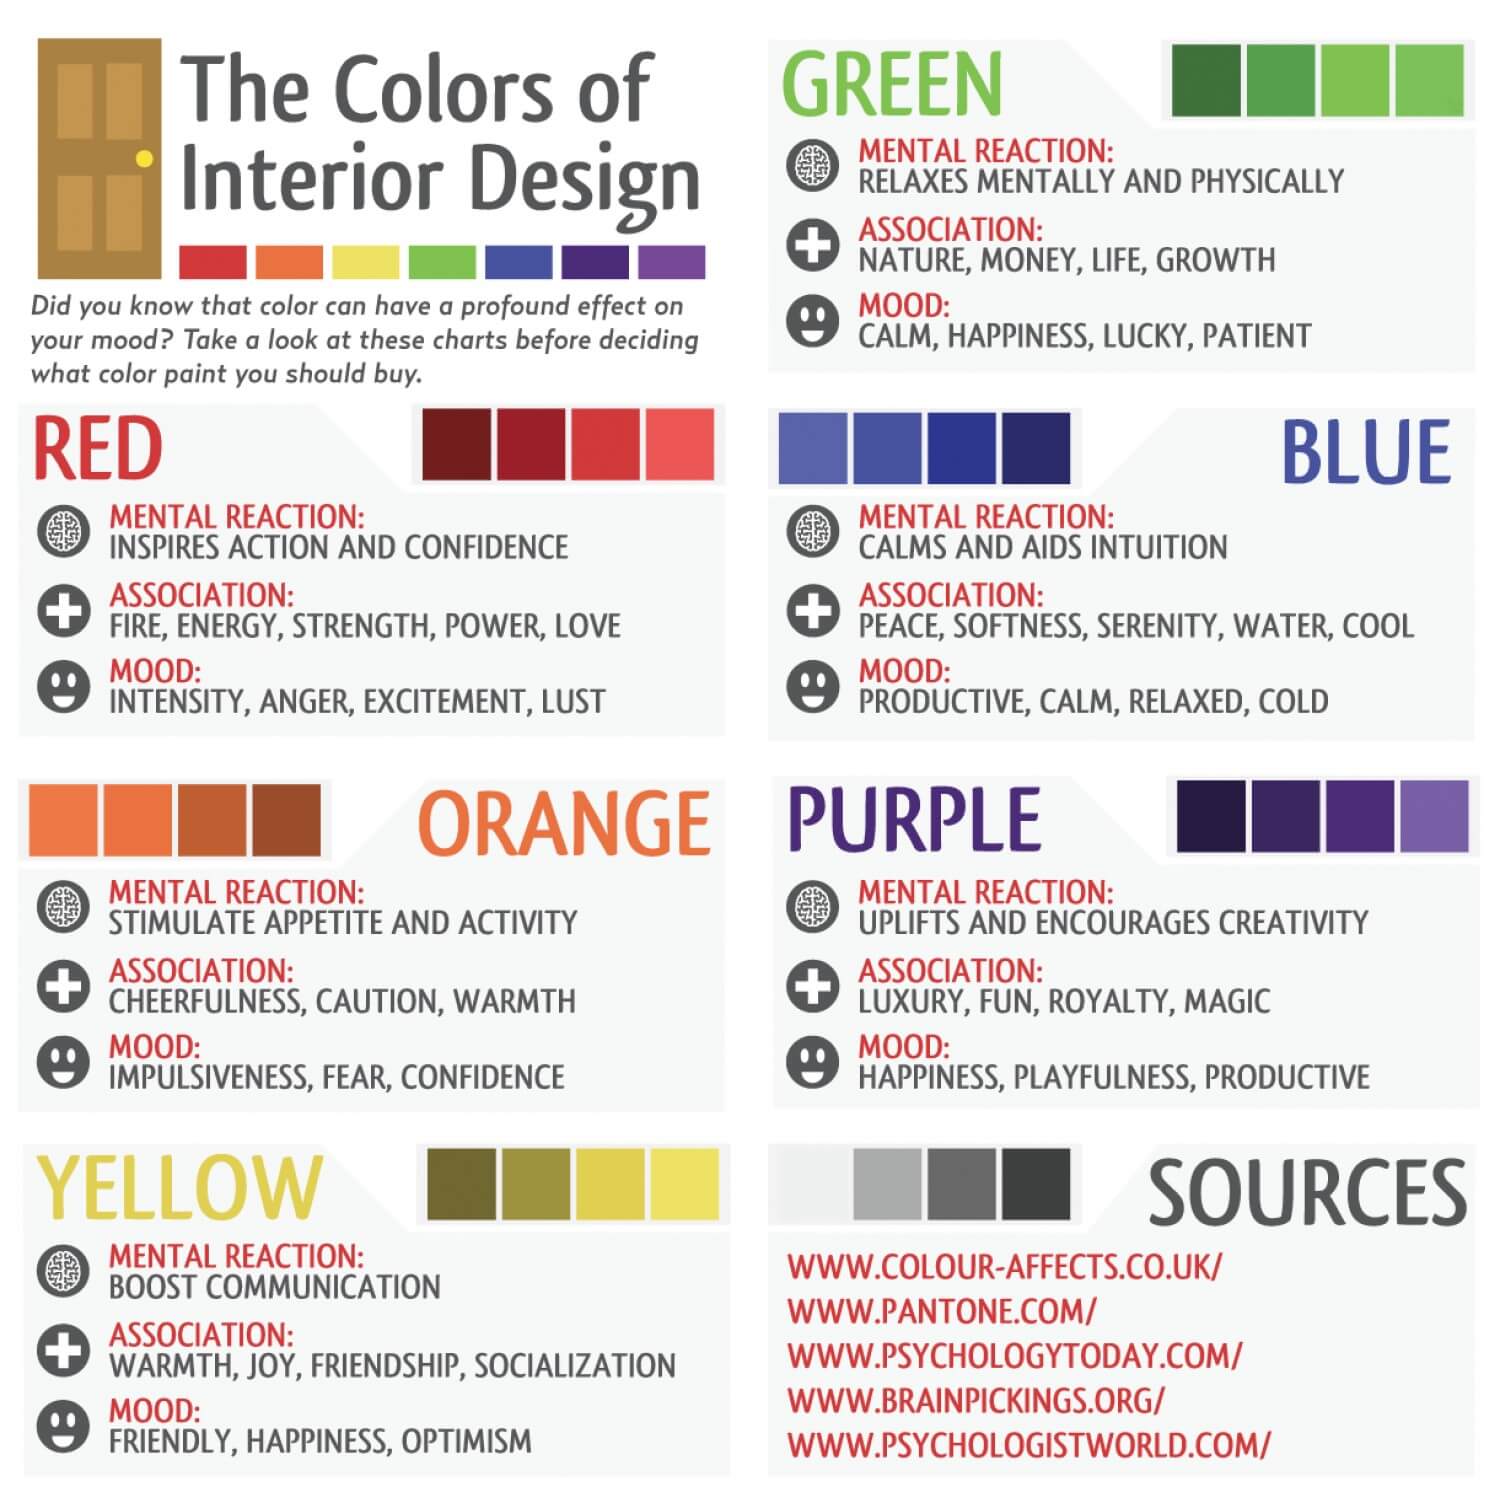
The choice of color can set the mood and reflect your personality. Consider the room’s size, function, and lighting when selecting a color. Lighter colors can make a room feel spacious, while darker shades add warmth and intimacy. Using color swatches or digital painting tools can help visualize the final result.
The following chart can help you decide on the color and the mood that it helps to establish:
Paint Finish
The finish of your paint (from flat to high gloss) can affect both appearance and durability. Flat finishes hide imperfections but are harder to clean, while glossy finishes are more durable and easier to clean, but they may highlight imperfections.
I’ll go into more detail on paint finishes in the section below.
Primer
Using a primer prepares the wall by providing a uniform surface for the paint to adhere to. Some paints come with primer included, while others require a separate primer coat. The type of primer will depend on the existing surface and the chosen paint.
Specialty Paints
For unique requirements like moisture resistance in bathrooms or easy-to-clean surfaces in a kitchen, specialty paints may be necessary. These are formulated to withstand specific conditions and can add to the longevity and appearance of your paint job.
Step 3: Prepare Your Wall for Painting
Preparation is the cornerstone of any good paint job. Start this phase by cleaning your wall with a damp cloth to eliminate any dust or grime. If you find any cracks or holes in the wall, these should be addressed next. Use a putty knife and some spackling paste to fill them in, creating a smooth surface ready to be painted.
Once the wall is clean and repaired, employ the painter’s tape to protect areas you don’t wish to paint. These can include baseboards, trim, light switches, and power outlets. The process may be time-consuming, but diligent preparation paves the way to a professional-looking finish and saves you from the frustration of meticulous touch-ups later on.
Step 4: Prime Your Wall
Priming the wall is an essential step that many may overlook. Primers provide a smooth, neutral surface for the paint to adhere to, enhancing its color.
The application of the primer involves a brush or a roller, starting from the top of the wall and working your way down. Ensure the primer dries completely before proceeding. Not only does primer help create a uniform color, but it can also reduce the number of paint coats you need to apply, thereby saving you time and money.
Step 5: Apply Your Chosen Paint
With your wall primed and ready, it’s time to add some color! Begin at the top of the wall, working your way downwards. Use a roller for larger areas and a brush for edges or smaller sections.
I suggest applying the paint in a “W” pattern for an even distribution. Essentially, this method involves painting a “W” shape on the wall and then filling in the spaces without lifting the roller. To start, you would dip the roller in paint and begin by painting a large “W” shape on the wall, approximately 3 feet by 3 feet. Then, without lifting the roller from the surface, you would fill in the spaces of the “W” using horizontal and vertical strokes. This technique ensures that the paint is spread evenly without creating visible lines or streaks.
Take your time during this process. A rushed paint job can lead to uneven coats and visible brush strokes. Once you’ve finished the first coat, let it dry completely before applying the second. This patience ensures that the paint adheres properly and provides a smoother finish.
Here is a popular, beginner’s level video that demonstrates how to apply paint to a wall:
Step 6: Perform Post-Painting Clean-Up and Care
Congratulations on painting your wall! But the job isn’t finished just yet. Post painting clean-up is essential to maintaining your tools and the new look of your wall. Remove the painter’s tape carefully, making sure not to peel away any fresh paint.
For your brushes and rollers, clean them promptly after use to prolong their lifespan. For water-based paints, warm soapy water works well, while oil-based paints may require a specialized paint thinner for cleaning. Remember to dry your tools thoroughly before storing them to prevent rusting.
Additionally, consider how to maintain your newly painted wall. Try to avoid touching it until it is fully cured, which can take up to two weeks. If you spot any minor scuffs or stains in the future, a soft, damp cloth can be used for cleaning. Avoid harsh chemicals that could damage the paint finish.
Common Mistakes and How to Avoid Them
Painting might seem like a straightforward task, but several common mistakes can affect the outcome of your project. Being aware of these pitfalls and knowing how to avoid them can save you time, money, and frustration. Here are three typical mistakes and how you can steer clear of them.
Mistake 1: Skipping Surface Preparation
Surface preparation is essential for achieving a smooth, long-lasting paint job, but it’s often skipped or rushed. Failing to prepare the surface properly can lead to uneven paint application, peeling, or cracking.
How to Avoid It: Take the time to clean, sand, and prime the surface. Remove any dust, grease, or old paint, fill in cracks and holes, and sand the surface to ensure a smooth base. Applying a primer can help the paint adhere properly and create a uniform appearance.
Mistake 2: Using the Wrong Tools or Techniques
Choosing the wrong brushes, rollers, or painting techniques can result in streaks, uneven coverage, and a less-than-professional finish.
How to Avoid It: Select the appropriate tools for the type of paint and the surface you are painting. As we discussed earlier, different brushes and rollers are suited for different tasks and paint types. Make sure to use them in the proper manner, such as utilizing long, even strokes with a brush or a ‘W’ pattern with a roller to ensure uniform coverage.
Mistake 3: Ignoring Proper Ventilation
Failing to ensure proper airflow during and after painting can lead to health issues and affect the drying process of the paint. The fumes from both oil-based and water-based paints can contain chemicals that are harmful if inhaled in large quantities or over prolonged periods.
How to Avoid It: Keep windows and doors open, and use fans if necessary to create adequate ventilation. Avoid painting in enclosed spaces without proper airflow. Consider weather conditions, as painting on an overly humid or rainy day without proper indoor ventilation can also affect drying times and the paint finish.
Mistake 4: Applying a Second Coat Too Quickly
Applying a second coat of paint before the first has adequately dried can lead to streaking, peeling, or uneven color.
How to Avoid It: Patience is key here. Always follow the manufacturer’s instructions on drying times between coats. If in doubt, give it a little more time. Testing the dryness by touching a hidden part of the wall can also help you gauge when it’s safe to apply the next coat.
Understanding Paint Finishes
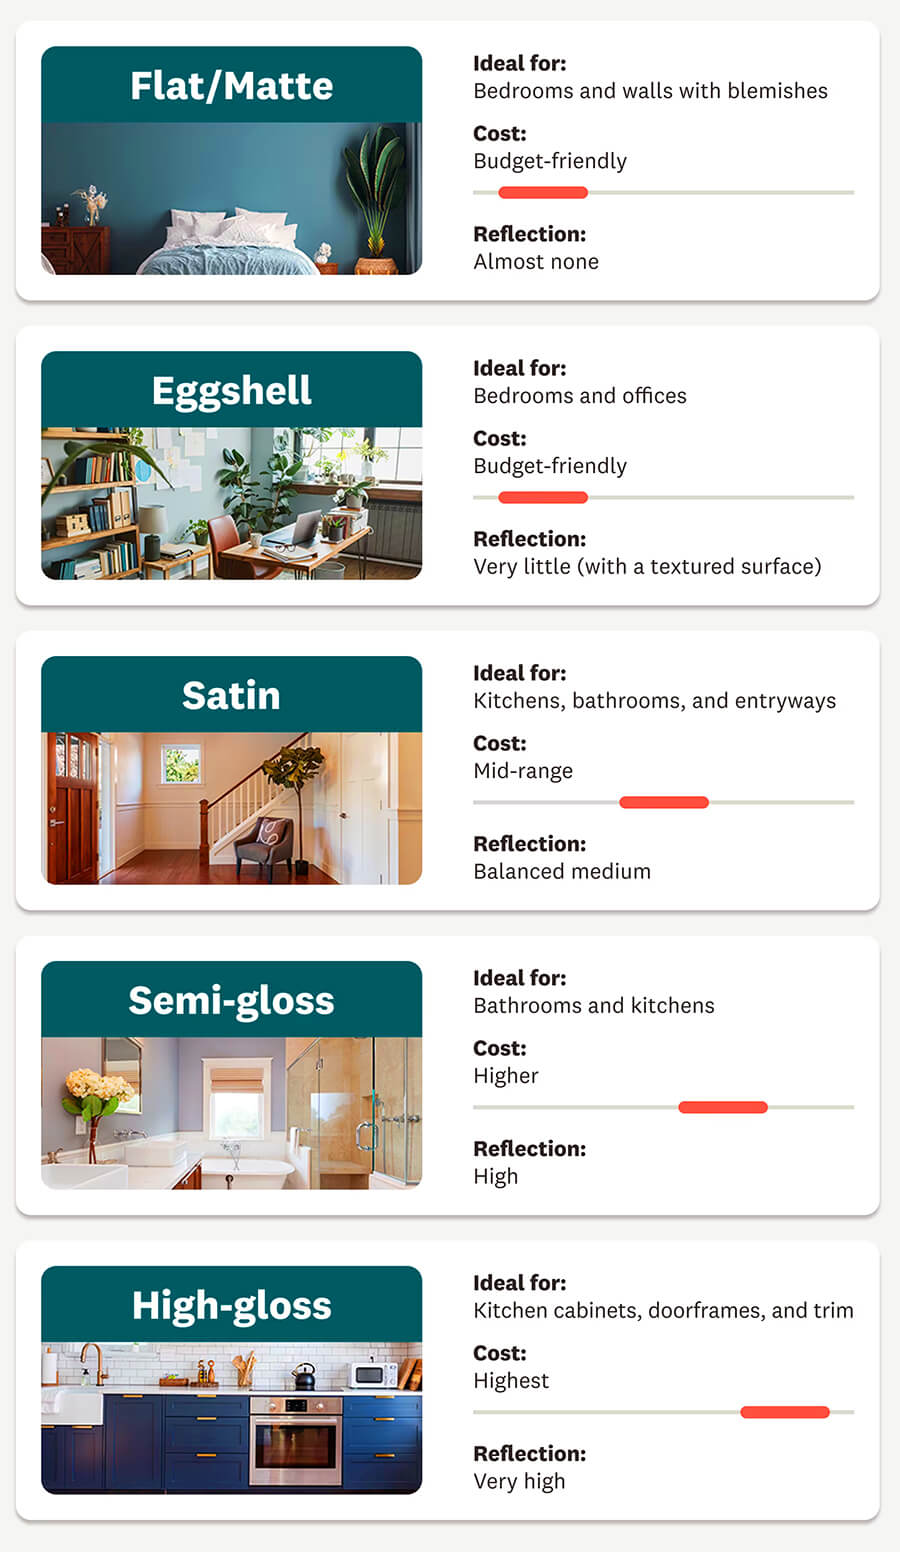
The finish of your paint can dramatically influence the room’s final look and its maintenance. As I mentioned earlier, paint finishes range from flat (no shine) to high gloss (very shiny), each with its unique attributes.
- Flat finishes, or matte finishes as they are also known, provide a non-reflective appearance. They can effectively mask minor wall imperfections such as bumps or small cracks, providing a smooth, uniform look. Despite their aesthetic appeal, flat finishes are less durable and more challenging to clean compared to other finishes. This makes them ideal for low-traffic areas that won’t require frequent cleaning, like adult bedrooms and home offices.
- Eggshell finishes offer a step up in durability and washability from flat finishes. They have a slight hint of shine, resembling the low sheen of an eggshell, hence the name. Eggshell is a popular choice for many homeowners because it combines some of the durability of glossier finishes with the smooth, subtle elegance of a flat finish. It’s particularly well-suited to living rooms and dining rooms.
- Satin finishes provides a soft, velvety sheen that’s more reflective than flat but less so than gloss. Satin’s subtle shine adds depth and richness to a room, making it feel elegant and cozy. This finish is more resistant to stains and somewhat easier to clean compared to flat finishes, making it suitable for living rooms, hallways, or even children’s bedrooms.
- Semi-gloss finishes provide a more radiant sheen than eggshell finishes. As they reflect more light, they tend to highlight imperfections on the wall surface. However, their major advantage lies in their durability and ease of cleaning. Semi-gloss finishes are resistant to moisture and can be cleaned easily with a damp cloth, making them perfect for high-traffic areas or rooms with high moisture levels, such as kitchens and bathrooms.
- High-gloss finishes are the most durable of all. They offer a high-reflective shine, making them an attractive choice for highlighting details like trim, molding, and doors. Still, their high shine also means they will highlight any imperfections on the wall. High-gloss paints are the easiest to clean and are highly resistant to moisture and wear. They’re often used sparingly in residential interiors, on surfaces like kitchen cabinets, doors, and trim.
Choosing the right finish for your painting project is as crucial as picking the right color. It can dramatically impact how your color choice looks under different lighting conditions and how well your paint job stands up to wear and tear over time. By understanding the properties of different paint finishes, you can make a more informed decision that you’ll be happy with in the long term.
The following useful image summarizes pain finishes for easier reference:
Embracing Creativity
Painting a wall is more than just covering it with a new color. It’s a chance to truly express yourself and make a space uniquely yours. I remember the first time I decided to step outside the box and explore different painting techniques; I was both excited and nervous. The idea of creating something personal was thrilling, but I wasn’t sure if I could pull it off. Yet, embracing creativity in painting opened up a whole new world for me.
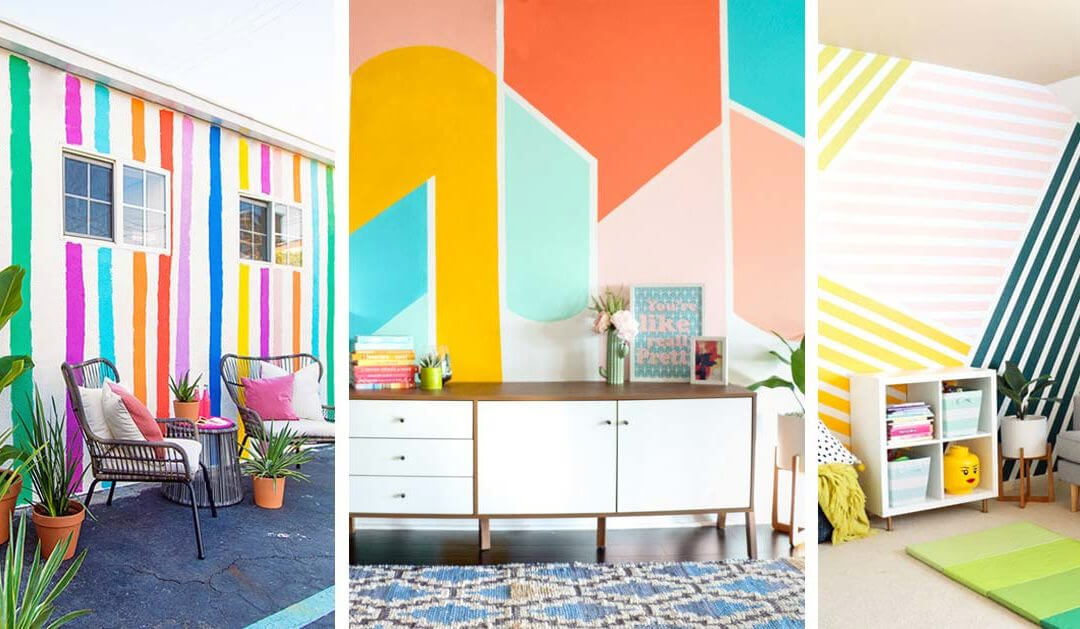
There are many creative techniques you can explore. For instance, sponging can add texture and depth to a wall, turning it into a visual masterpiece. I’ve used sponging in my living room to create a soft, mottled effect that makes the walls come alive. Rag rolling is another technique that can produce stunning effects, allowing for variations in color and pattern. When I tried rag rolling in my study, it gave the room a rustic, vintage feel that I fell in love with. Color blocking, stencils, and murals are other ways you can turn a simple wall into something extraordinary.
Here are a couple of examples of creative ways to paint a wall:
Final Words
In conclusion, painting a wall is a transformative process that lets you infuse your personality into your space. Every step, from selecting the right paint and tools to understanding the importance of preparation, plays a significant role in the outcome. So, the next time you see a blank wall, view it as an opportunity – an opportunity to create, to transform, and to leave a piece of yourself in your environment. Armed with the knowledge from this guide, you’re ready to tackle your painting project with confidence. Happy painting!