Hello, fellow garden enthusiasts! I’m thrilled to share my passion for gardening with you and guide you through the fascinating journey of growing plants from seeds. From personal experience, I can tell you that it’s an incredibly rewarding and enriching way to connect with nature, save money, and expand your gardening horizons.
In this detailed guide, I’ll cover everything you need to know about how to grow any plant from a seed, including practical tips, tried-and-tested methods, and my favorite products to help you succeed. So, whether you’re an experienced gardener or a homeowner just starting out, let’s embark on this exciting adventure together.
Table of Contents
- Choosing the Right Seeds
- Preparing the Soil
- Seed Germination and Propagation
- Transplanting Seedlings
- Plant Care and Maintenance
- Harvesting and Saving Seeds
- Troubleshooting Common Seed Starting Problems
- Conclusion
Choosing the Right Seeds
Before you can start growing plants from seeds, you’ll need find the right seeds for your garden. I remember when I first started gardening; I was overwhelmed by the sheer variety of seeds available. After years of trial and error, I’ve learned that considering factors like plant species and varieties, climate and growing conditions, and seed quality and germination rate are crucial.
A. Factors to Consider When Selecting Seeds
1. Plant Species and Varieties
When choosing seeds, it’s essential to think about your gardening goals and the types of plants that will thrive in your climate. For example, if you live in a hot, arid region, you might want to consider drought-tolerant plants like succulents or native wildflowers.
If you’re like me and love growing vegetables, opt for disease-resistant varieties for a more successful harvest. Last year, I tried the “Celebrity” tomato variety, and it performed exceptionally well in my garden, resisting common diseases and producing delicious, juicy tomatoes.

In case you need help in deciding what to grow and how it can be done in your area, I warmly recommend getting the high-rated book by Kevin Espiritu, “Field Guide to Urban Gardening: How to Grow Plants, No Matter Where You Live”. It outlines how to grow various edible and decorative plants, how to plan your person garden, how to deal with pests and diseases, and much more. Click here to read additional reviews for this book.
2. Climate and Growing Conditions
To ensure your plants grow successfully, it’s crucial to choose seeds suitable for your region’s climate. I learned this the hard way when I tried to grow heat-loving plants in my cooler USDA hardiness zone. To avoid such disappointments, determine your hardiness zone and choose plants accordingly.
Hardiness zones are geographical areas defined by the average annual minimum temperature experienced in that region. While it’s impossible to provide an exhaustive list of plants for each hardiness zone, here are a few examples for different zones:
- Zone 3: Cold-tolerant plants such as peonies, Siberian iris, and various species of conifers can thrive in this zone.
- Zone 5: Many deciduous trees, shrubs, and perennials like sugar maple, lilacs, and hostas can successfully grow in this moderate climate.
- Zone 7: Plants like crepe myrtles, camellias, and gardenias, which require moderate winter temperatures, can flourish in this zone.
- Zone 9: Warm-climate plants such as citrus trees, bougainvillea, and oleander are well-suited for this zone.
For the complete list of hundreds of plants divided by 13 hardiness zones, visit Gardenia website.
Additionally, observe your garden’s microclimate, considering factors like sunlight, wind, and drainage to create the optimal growing environment.
3. Seed Quality and Germination Rate
Seed quality plays a crucial role in the success of growing plants from seeds, as it can directly impact germination rates and overall plant health. High-quality seeds generally have better germination rates, which means a higher likelihood of successful seedlings. When selecting seeds for planting, consider factors such as seed viability, freshness, and the source of the seeds.
Seed viability refers to the ability of seeds to germinate and grow into healthy plants. The viability of seeds can decline over time due to factors like aging, improper storage, or exposure to extreme temperatures and humidity. To increase your chances of successful germination, it’s best to use fresh seeds that have been stored correctly. When purchasing seeds, I always check the packaging date and opt for seeds that have been packaged within the last year or two. Some seeds, like onions and parsnips, have a shorter shelf life, so pay close attention to their freshness.
B. Sources for Purchasing Seeds
1. Local Nurseries and Garden Centers
Local nurseries and garden centers can be valuable resources for gardeners looking to grow plants from seeds. They often offer a wide variety of seeds, seed starting supplies, and knowledgeable staff who can provide expert advice and guidance on choosing the right seeds and growing conditions for your area.
By supporting local businesses, you’re not only contributing to your community’s economy, but you’re also more likely to find seeds that are well-suited to your region’s specific climate, soil conditions, and potential pest or disease issues.
In addition to offering seeds and supplies, many local nurseries and garden centers host workshops, seminars, and other educational events that can help you learn more about growing plants from seeds and expand your gardening knowledge. Some even offer plant clinics, where you can bring in samples of your plants or seeds for expert diagnosis and advice on any issues you may be experiencing.
2. Online Seed Suppliers
Shopping online for seeds has opened up a world of possibilities for me, offering access to a vast range of seed varieties. Some of my favorite online seed suppliers include Burpee Store, Mountain Valley Seed Company, and Perennial Farm Marketplace.

All of them offer high-quality seeds at low prices. And the variety of the seeds is just amazing! Each store has an awesome selection of vegetables, fruits, flowers, and other types of lovely plants.
3. Seed Swaps and Exchanges
Seed swaps and exchanges are exciting events where gardeners come together to trade seeds and share their favorite plant varieties. These gatherings provide an excellent opportunity for you to acquire new and unique seeds that may not be available at your local nursery or garden center. This is how you can expand your plant collection, discover rare and heirloom varieties, and exchange valuable gardening tips with other gardeners.
Beyond the fun of discovering new seeds, seed swaps and exchanges also promote biodiversity and help preserve heritage plant varieties that might otherwise be lost. Attending seed swaps or joining seed exchange groups, either in-person or online, allows you to become an active participant in the preservation and propagation of unique and diverse plant varieties, while also enriching your own garden with exciting new plants to grow from seed.
Preparing the Soil
One of the most critical factors in successful seed germination and plant growth is healthy soil. I’ve learned that understanding my soil’s characteristics and making necessary amendments has had a significant impact on the health and vigor of my plants.
A. Soil Types and Their Characteristics
1. Clay Soil
Clay soil is heavy and dense, with small particles that can hold water and nutrients well. However, it can become compacted and have poor drainage, making it challenging for some plants to thrive. In my garden, I’ve improved clay soil by adding organic matter, like compost, to increase aeration and drainage.
Examples of plants that can be grown in the clay soil:
- Sunflowers (Helianthus annuus): These tall, sturdy plants can grow in heavy clay soils, as their strong roots can penetrate the dense soil structure.
- Daylilies (Hemerocallis): Daylilies are adaptable perennials that can tolerate clay soils, as long as they have adequate drainage.
- Rudbeckia (Rudbeckia spp.): Also known as black-eyed Susans, these flowering plants can thrive in clay soils, provided they receive adequate moisture.
- Japanese iris (Iris ensata): These moisture-loving plants can grow in heavy clay soils, as long as there is sufficient drainage to prevent waterlogging.
2. Sandy Soil
Sandy soil has larger particles, allowing for better drainage and aeration. However, it can struggle to retain moisture and nutrients, which can make it challenging for some plants to grow. In my experience, adding organic matter to sandy soil helps improve water and nutrient retention, creating a more hospitable environment for plants.
Examples of plants that can be grown in the sandy soil:
- Cacti and succulents: These plants are well-adapted to sandy soils due to their ability to store water and withstand drought conditions.
- Lavender (Lavandula): This fragrant, sun-loving plant thrives in well-drained sandy soils.
- Carrots (Daucus carota): Root vegetables like carrots grow well in sandy soils, as the loose texture allows their roots to develop without obstruction.
- Rosemary (Rosmarinus officinalis): This Mediterranean herb prefers well-draining, sandy soils and is drought-tolerant.
3. Loamy Soil
Loamy soil is the ideal soil type for most plants, as it has a balanced mix of sand, silt, and clay particles. This balance provides excellent drainage, aeration, and nutrient retention, promoting healthy plant growth. If you’re fortunate enough to have loamy soil in your garden, you’ll find that most plants will thrive without much intervention.
Examples of plants that can be grown in the loamy soil:
- Tomatoes (Solanum lycopersicum): Loamy soils provide the perfect balance of moisture and nutrients for tomatoes to thrive.
- Bell peppers (Capsicum annuum): Similar to tomatoes, bell peppers grow well in nutrient-rich loamy soils.
- Hostas (Hosta): These shade-loving perennials appreciate the well-draining, fertile nature of loamy soils.
- Azaleas (Rhododendron): These flowering shrubs grow well in loamy soils that are slightly acidic and well-draining.
Here is a CrashCourse video that explains more about these and other types of soil:
B. Soil Testing and Amendments
1. Conducting a Soil Test
Conducting a soil test has been a game-changer for my garden. By understanding my soil’s pH and nutrient levels, I’ve been able to make targeted amendments to create the perfect environment for my plants. You can purchase a soil test kit online or from your local garden center, or send a soil sample to a professional lab for more accurate results.

Personally, I prefer using SONKIR Soil pH Meter. Not only is it quite cheap, this tester also checks your soil’s pH, moisture and available light at the same time. You get 3 different tests, all in one soil test kit. SONKIR Soil pH Meter is quite popular on Amazon, you can click here to read over 37,000 positive reviews that it received.
2. Adjusting Soil pH
Different plants have varying pH preferences, and ensuring your soil’s pH is within the optimal range is crucial for plant health. After discovering that my soil was too acidic for my vegetable garden, I added agricultural lime to raise the pH, and I’ve seen a noticeable improvement in my plants’ health and productivity.
3. Adding Organic Matter and Nutrients
Regularly adding organic matter, such as compost or aged manure, to your soil not only improves its structure and nutrient content but also promotes beneficial microorganisms. I make it a point to add compost to my garden beds every spring and fall to keep my soil healthy and fertile.
Making compost is a fantastic way to recycle kitchen scraps and yard waste while creating a nutrient-rich, organic amendment for your garden soil. To make compost, start by selecting a suitable location for your compost pile or bin, preferably in a shaded area with good drainage.
Begin layering green materials, such as fruit and vegetable scraps, grass clippings, and coffee grounds, with brown materials like dried leaves, straw, and small branches. Aim for a ratio of about 2-3 parts brown material to 1 part green material.
Be sure to turn your compost regularly, about once every 1-2 weeks, to promote aeration and speed up the decomposition process. With proper maintenance, your compost pile will break down into rich, crumbly humus within a few months to a year, ready to be incorporated into your garden beds to nourish your plants and improve soil structure.
Seed Germination and Propagation
After choosing the right seeds and preparing your soil, it’s time to focus on seed germination and propagation. You can choose between starting seeds indoors or sowing them directly outdoors, depending on your plant type and growing conditions.
A. Indoor Seed Starting
1. Containers and Trays
When I started growing seeds indoors, I experimented with various containers, like seed starting trays, peat pots, and repurposed yogurt cups. Just make sure the containers you choose have drainage holes and are sterilized to prevent disease and promote healthy seedling growth.
2. Growing Medium and Seed Sowing
I’ve found that using a sterile, soilless seed starting mix is essential for successful indoor seed starting. These mixes provide proper drainage and aeration, reducing the risk of disease. When sowing seeds, always follow the seed packet instructions for sowing depth and spacing, and gently cover the seeds with the growing medium.
3. Light, Temperature, and Humidity Requirements
Providing adequate light for your seedlings is critical. I use a combination of fluorescent and LED grow lights, ensuring 14-16 hours of light daily. Maintaining a consistent temperature between 65-75°F (18-24°C) is also important, and I’ve found that using heat mats or room heaters can help achieve this. I also use humidity domes or plastic wrap to maintain moisture during germination, but remember to remove them once seedlings emerge to prevent damping-off (see explanation below).
Here is a great video from GrowVeg that demonstrates successful seed planting techniques:
B. Outdoor Seed Sowing
1. Direct Sowing in the Garden
Direct sowing seeds outdoors is a straightforward and natural method for many plants, especially those that don’t transplant well. To ensure success, choose the right time to sow seeds based on your region’s last frost date and the plant’s specific requirements. I always double-check seed packet instructions for the optimal planting time and conditions.
2. Preparing Garden Beds for Sowing
Before direct sowing, I make sure to prepare my garden beds by removing any weeds, debris, or rocks and loosening the soil to improve aeration and drainage. If necessary, I also add compost or other organic matter to enrich the soil and promote healthy seed germination.
3. Sowing Techniques and Seed Spacing
Sowing seeds outdoors can be as simple as scattering them across a prepared garden bed or as precise as planting them individually at specific depths and intervals. Again, follow the seed packet instructions for proper seed depth and spacing, and thin seedlings as needed to allow for optimal growth and air circulation.
Transplanting Seedlings
If you’ve started your seeds indoors, transplanting them into your garden is a crucial step that requires care and attention. I’ve learned that proper timing, acclimatization, and transplanting techniques can significantly impact seedling survival and growth.
A. Hardening off Seedlings
Gradually acclimating your seedlings to outdoor conditions is vital to ensure their survival. I typically begin the hardening off process about two weeks before transplanting by setting my seedlings outdoors in a sheltered location for a few hours each day, gradually increasing their exposure to sunlight, wind, and fluctuating temperatures.
B. Transplanting Techniques
1. Preparing the Planting Hole
When transplanting seedlings, I carefully prepare the planting hole by digging it deep and wide enough to accommodate the root system, and I add compost or other organic matter to improve soil fertility.
2. Gently Removing Seedlings from Containers
To minimize root damage and stress, I carefully remove seedlings from their containers by gently squeezing the sides to loosen the soil and using a spoon or small trowel to lift them out.
3. Planting and Watering Seedlings
When planting seedlings, I ensure they’re placed at the same depth they were growing in their containers and space them according to their mature size requirements. Immediately after planting, I water them thoroughly to help settle the soil and establish good root-to-soil contact.
Plant Care and Maintenance
After planting, ongoing care and maintenance are crucial for healthy, thriving plants. Over the years, I’ve developed a routine that includes watering, fertilizing, pest management, and pruning to keep my garden in tip-top shape.
A. Watering
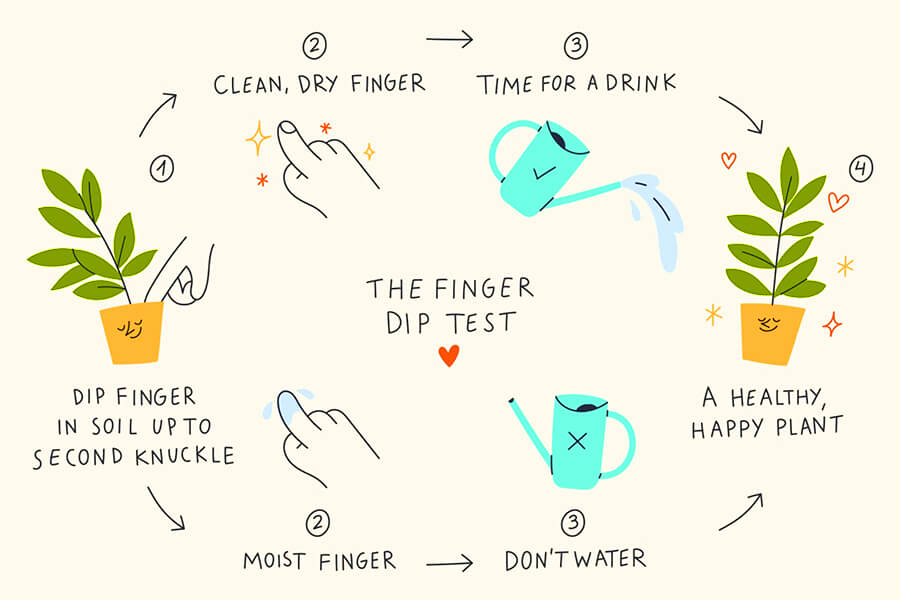
1. Monitoring Soil Moisture
Monitoring soil moisture is necessary for healthy plant growth. I generally use the “finger test” by sticking my finger into the soil about an inch deep to check if it’s time to water. Remember that different plants have varying water requirements, so it’s crucial to tailor your watering routine accordingly.
2. Watering Techniques
I’ve found that watering methods like drip irrigation or soaker hoses are more efficient and help conserve water. These methods also reduce the risk of disease by keeping foliage dry and delivering water directly to the plant’s roots.
By implementing effective watering techniques, you can ensure that your plants grown from seeds receive the proper hydration they need to thrive, while minimizing the risk of diseases and other water-related issues.
B. Fertilizing
1. Organic and Synthetic Fertilizers
Both organic and synthetic (or chemical) fertilizers have their pros and cons, and choosing the right one depends on your gardening preferences and goals. I prefer using organic fertilizers, such as compost or worm castings, as they release nutrients slowly and promote soil health.
The following table compares between the two types of fertilizers:

2. Fertilizer Application Methods and Timing
Applying fertilizer at the right time and in the correct manner guarantees the plant’s health. I generally follow the specific instructions provided on the fertilizer package regarding application rates and timing. For many plants, I’ve found that applying fertilizer during the active growing season, usually in the spring and early summer, works best.
My fertilizer of choice is Burpee Natural Organic All Purpose Granular Plant Food. It’s suitable for a wide variety of plants, including vegetables, fruits, flowers, and even indoor plants. This versatility has made it a staple in my gardening routine, as I no longer need to purchase multiple fertilizers for different types of plants.

Another aspect I appreciate about this product is its organic composition. The Burpee Natural Organic Plant Food is derived from natural sources like feather meal, bone meal, and processed manure. Thanks to this formula, my plants receive the nutrients they need without any harmful chemicals. As a result, my garden is now more environmentally friendly.
C. Pest and Disease Management
1. Preventative Measures
Preventative measures are key to effective pest and disease management when growing plants from seeds. By creating a healthy growing environment and implementing proactive strategies, you can minimize the risk of pest infestations and disease outbreaks in your garden.
One important preventative measure is practicing good garden hygiene, which includes keeping your growing area clean, removing plant debris, and promptly disposing of any diseased or infested plants. Proper sanitation helps prevent the spread of diseases and pests, maintaining a healthier environment for your seedlings.
Another aspect of preventative pest and disease management is crop rotation, which involves changing the location of your plants each growing season. This practice helps to disrupt the life cycle of pests and diseases that may be specific to certain plant families, reducing the likelihood of recurring issues.
Additionally, companion planting, or growing plants that benefit each other in close proximity, can help deter pests, attract beneficial insects, and improve overall plant health. Encouraging biodiversity in your garden by planting a diverse range of plant species can also create a more resilient ecosystem that is less susceptible to pest and disease outbreaks.
By taking a proactive approach to pest and disease management, you can create a healthier, more productive garden for your plants grown from seeds.
2. Biological and Chemical Control Methods
If pest or disease problems do arise, I usually opt for biological control methods like introducing beneficial insects or using organic, targeted treatments. However, sometimes chemical control methods may be necessary to combat severe infestations or diseases.
Biological control methods involve using living organisms, such as beneficial insects, bacteria, or fungi, to help control pests and diseases naturally. For example, introducing ladybugs or lacewings can help control aphids, while certain strains of bacteria like Bacillus thuringiensis (Bt) can target caterpillars and other pests. By encouraging a balanced ecosystem and supporting beneficial organisms in your garden, you can help keep pest populations in check and promote overall plant health.
When it comes to chemical control methods, use them judiciously and as a last resort, as they can sometimes cause unintended harm to beneficial organisms or the environment. If you choose to use chemical controls, go for organic or least-toxic options whenever possible, such as insecticidal soaps, horticultural oils, or organic fungicides like neem oil. Always follow the label instructions carefully and apply these treatments selectively, targeting only the affected plants or pests.
D. Pruning and Maintenance
Regular pruning and maintenance are a must if you wish to keep your plants healthy and productive. I’ve found that removing dead or damaged foliage, pinching back leggy growth, and pruning to promote air circulation can significantly improve plant health and appearance.
Harvesting and Saving Seeds
A. Harvesting
One of the most rewarding aspects of growing plants from seeds is the moment you can finally harvest the fruits of your labor. Whether it’s a beautiful bouquet of flowers or a bountiful vegetable harvest, knowing when and how to harvest your plants is essential for enjoying the best quality and taste. Follow specific plant guidelines for harvesting and use clean, sharp tools to minimize damage and disease.
Here are a few harvesting examples for common plants:
- Tomatoes (Solanum lycopersicum): Harvest tomatoes when they are fully colored and slightly firm to the touch, ensuring maximum flavor and ripeness.
- Green beans (Phaseolus vulgaris): Pick green beans when they are young, tender, and about the thickness of a pencil to enjoy the best texture and taste.
- Zucchini (Cucurbita pepo): Harvest zucchini when it is about 6-8 inches long and still tender, as larger zucchinis can become tough and less flavorful.
- Basil (Ocimum basilicum): Snip basil leaves as needed, but harvest more heavily before the plant starts to flower to encourage bushy growth and maintain the best flavor.
- Peonies (Paeonia spp.): Cut peony flowers in the “marshmallow stage,” when the buds are soft and slightly squishy to the touch, to maximize their vase life.
B. Saving Seeds
Saving seeds from your plants can be a cost-effective and sustainable way to propagate future generations of plants. Over the years, I’ve enjoyed experimenting with seed saving and have discovered the importance of selecting open-pollinated or heirloom varieties, proper seed cleaning and drying techniques, and suitable storage conditions for maintaining seed viability.
As for seed storage, I’m using the simple but effective SGHUO 1 Pack 64 Grid Diamond Painting Tool Box. It’s great for storing a great number of any small objects, such as seeds, thus saving a lot of space. It costs next to nothing, and you get 64 small containers inside one bigger box, which is way more than what a beginning gardener needs. You can also adjust the space inside the big box using dividers. Click here to see other uses for this storage box.

Troubleshooting Common Seed Starting Problems
Growing plants from seeds can sometimes come with its fair share of challenges. Over time, I’ve encountered a few common problems and have learned how to address them to ensure successful germination and growth.
A. Damping-off
Damping-off is a common fungal disease that affects seedlings, causing them to collapse and die. To prevent damping-off, I use sterile growing media and containers, provide proper air circulation, and avoid overwatering.
B. Poor Germination
If your seeds are not germinating, there could be several reasons, such as incorrect temperature, insufficient moisture, or old seeds. I always make sure that I’m providing the right conditions for germination and use fresh seeds with a high germination rate.
C. Leggy Seedlings
Leggy seedlings often result from insufficient light, causing the plants to stretch towards the light source. To address this issue, I use grow lights and place them close to the seedlings, ensuring they receive adequate light for healthy growth.
The grow lights I utilize are GooingTop LED Grow Light. I chose to use them because of the full spectrum light they emit, mimicking the natural midday sunlight. This helps the plants to achieve optimal growth. The lights come with a timer, so you don’t have to worry that you forgot to turn them off. You can also control the light intensity, dimming it according to your plants’ particular demands.

The gooseneck design of the GooingTop LED Grow Light is another feature that I like. The adjustable arms make it incredibly easy to direct the light exactly where it’s needed, guaranteeing that all my plants receive adequate illumination. The sturdy clamp secures the light stays in one place, even when the gooseneck arms are fully extended.
All in all, this is a terrific solution for anyone who grows plants indoors and wishes for the best results. These grow lights are also highly energy-efficient, using only 60 watts of power. They are also an Amazon’s Choice product with over 12,750 positive reviews, which you can read here.
D. Nutrient Deficiencies
If your seedlings are showing signs of nutrient deficiencies, such as yellowing leaves or stunted growth, it could be due to poor quality growing media or a lack of nutrients in the soil. If you’re facing a nutrient deficiency, use a high-quality seed starting mix and apply a balanced, water-soluble fertilizer as needed to address any nutrient deficiencies.
Conclusion
In conclusion, growing plants from seeds can be an incredibly rewarding experience that allows you to connect with nature, expand your gardening skills, and enjoy the satisfaction of nurturing plants from tiny seeds to thriving, productive plants. By following this guide and using my personal tips and experiences, I’m confident that you too can successfully grow any plant from a seed and revel in the joys of gardening.
Happy gardening!