Growing your own plum tree from a seed can be a rewarding experience, akin to nurturing life from scratch. It’s a journey that will require patience, care, and the thrill of watching that first sprout push through the soil is priceless.
I remember the first time I grew my own plum tree from a seed. It started as a tiny, fragile sapling and over the years grew into a magnificent tree, laden with plump, juicy plums. If I can do it, so can you. Let me guide you through the process and show how to grow a plum tree from a seed.
How to Grow a Plum Tree from a Seed: Step-by-Step Guide
Step 1: Choose the Right Plum Seed
It all starts with choosing the right plum seed. I would recommend picking a local variety, as they are usually more acclimated to the regional climate and soil conditions. Visit your local nursery or farmers market and purchase a ripe plum. From this fruit, you will retrieve the seed, or pit, as it is also commonly known.
Take your time in selecting the plum. Look for one that’s ripe and juicy – these often yield the best seeds. I still remember my first plum picking. The fruit was perfectly ripe, the kind that drips juice down your chin when you take a bite. I knew then and there that it would give me the perfect seed for my tree.
For more suggestions on plum varieties, see Different Varieties of Plums That You Can Grow below.
Step 2: Extract and Prepare the Seed
Once you have your plum, the next step is to extract the seed. To do this, you’ll need to cut the plum open and remove the pit. Be careful not to damage the seed inside. This is a delicate process that requires a gentle touch.
After extracting the seed, it’s important to clean and dry it properly. Rinse the pit under running water to remove any attached fruit flesh. Once cleaned, let it dry for a few days in a shaded, cool location.
I often place mine on the kitchen window sill, away from direct sunlight. I have found this to be an effective method, which I first learned from my grandma. She had the most beautiful plum trees in her backyard and swore by this drying method.
Step 3: Start the Stratification Process
The next step is the stratification process. This simulates the cold winter conditions that plum seeds would naturally experience in the wild. Start by placing the dried plum pit in a plastic bag with a dampened peat moss or a paper towel. Seal the bag and place it in the refrigerator for about 6-8 weeks.
Stratification is a fascinating step that teaches us a lot about nature’s rhythms. I often mark my calendar to track the stratification period and find myself eagerly waiting for the day I can take out the seed. It reminds me of the anticipation I used to feel as a child, waiting for my birthday to arrive.
Step 4: Plant the Plum Seed
After the stratification process, it’s time to plant the seed. This is a milestone step in eveyr process of growing a plant from a seed. Prepare a pot with a mixture of compost and soil. Create a small hole in the center, about 3 inches deep, and place your seed inside, ensuring that it is completely covered with soil.

Having a high-quality potting soil can make a significant difference in your plum-growing journey. I personally recommend FoxFarm Ocean Forest Potting Soil for your seed planting needs. This organic soil blend is rich in nutrients, providing a fantastic starting point for your plum seeds. Its well-balanced pH and excellent water retention properties help create an optimal environment for root development, ensuring your young seedlings have a healthy start.
Planting the seed always feels like a ceremonial occasion. It’s a moment filled with promise and anticipation. The first time I planted a plum seed, I made a little event of it, inviting my kids to be a part of the experience. It made them feel connected to nature and taught them the value of patience.
Step 5: Provide Care and Maintenance
Once the seed is planted, the care and maintenance phase begins. Place the pot in a sunny location and water regularly, keeping the soil consistently moist but not soggy. Within a few weeks, you should start to see the first signs of growth – a small green shoot pushing up through the soil. I still remember the feeling of joy when I spotted the first shoot from my plum seed. It was like watching a child take their first steps.
In addition to watering, ensure your sapling is receiving enough light. Rotate the pot occasionally to ensure even exposure. As your plant grows, it may need to be repotted to accommodate its expanding root system. Choose a bigger pot and make sure you handle the young plant with care during the transition.
Step 6: Transplant Plum Sapling to the Garden
When your sapling is about 1 foot tall, which could take anywhere from 6 months to a year, it’s time to transplant it to the garden. This is a crucial step that needs to be done carefully. Choose a spot in your garden that gets plenty of sunlight and has good drainage. The hole for your sapling should be deep and wide enough to accommodate its root system without crowding it.
Transplanting day was always a big deal at my house. I would prepare the spot in the garden well in advance, digging the hole, and adding some compost to it. I remember how my hands would shake with a mix of excitement and anxiety as I gently eased the sapling into its new home. And the sigh of relief when it was finally in place, that’s something you have to experience yourself.
Step 7: Continue Caring for the Transplanted Plum Tree
Once transplanted, your plum tree will still require care and attention. Water it regularly, especially in dry periods, and ensure it’s getting enough nutrients. Regularly check for signs of pests or disease, as early detection can save your tree. You may also need to prune your tree to maintain its shape and health.
As your tree grows, you’ll form a relationship with it. My plum tree is not just a plant in my garden – it’s a testament to my patience, care, and dedication. Each year when it blooms and sets fruit, it’s a celebration. I still remember the first plum I tasted from my tree. It was the sweetest plum I’d ever eaten, perhaps because it was sprinkled with the sweet taste of achievement.
You tree will eventually award in a very generous matter, just as demonstrated in this awesome video from Self Sufficient Me:
Navigating Common Issues: A Troubleshooting Guide
Growing a plum tree from seed can have its fair share of challenges. Here’s a guide to help you troubleshoot some common issues you might encounter along your journey.
- Seed Doesn’t Germinate: This is a common problem many first-time growers face. Ensure that the seed underwent stratification, as plum seeds require this cold treatment to break dormancy. If the seed was stratified and still doesn’t germinate, it might be a dud – it happens, and it’s best to start over with a new seed.
- Seedling Wilts or Dies: If your seedling wilts or suddenly dies, it might be due to overwatering or a disease known as “damping-off”. Maintain moderate moisture levels in the soil, avoiding both extremes of waterlogging and drying out. A well-draining soil mix can help prevent these issues.
- Yellow or Pale Leaves: If your young plum tree has yellow or pale leaves, it might be suffering from nutrient deficiency, often nitrogen. Consider applying a balanced slow-release fertilizer to the soil.
- Holes in Leaves: If you notice holes in the leaves of your plum tree, it’s likely the work of pests. Common culprits include aphids, caterpillars, or Japanese beetles. Neem oil or insecticidal soaps can be an effective solution for pest problems.
- Poor Fruit Production: If your plum tree is a few years old but isn’t producing much fruit, there could be several reasons. Lack of sufficient sunlight, inadequate pollination, or excessive nitrogen in the soil can all affect fruit production. Remember, plum trees generally need plenty of sun and often require cross-pollination to bear fruit, so having another plum tree of a different variety nearby can help.
- Gummosis: This disease is identified by a gummy sap oozing from the trunk or branches. It could be due to several factors including fungal or bacterial infections, insect damage, or environmental stress. Proper care, avoiding tree injury, and regular monitoring can prevent this issue.
Remember, observing your plant regularly is key to early detection and effective treatment of most issues. Don’t be discouraged if you encounter problems along the way. It’s all part of the gardening journey, and every challenge overcome is a lesson learned and a step closer to your own bountiful plum harvest.
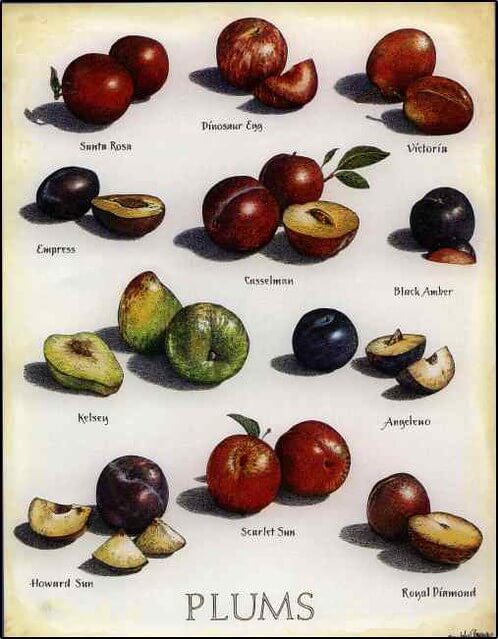
Different Varieties of Plums That You Can Grow
In the world of plums, variety is the spice of life. From sweet to tart, red to yellow, and everything in between, there’s a plum for every palate. Here is a table that summarizes most common plum varieties.
| Plum variety | Taste | Preferred climate | Additional facts |
|---|---|---|---|
| Santa Rosa | Sweet and tart, juicy | Warm | Developed by Luther Burbank |
| Satsuma | Sweet, firm | Warm to moderate | Red flesh and maroon skin |
| Damson | Tart | Cool to moderate | Often used in baking and making jams |
| Stanley | Sweet, juicy | Warm | Great for fresh eating and canning |
| Flavor Supreme Pluot | Intense sweet flavor | Warm | A plum and apricot hybrid |
| Green Gage | Sweet, honey-like flavor | Cool to moderate | Highly regarded for dessert, cooking, or canning |
| Victoria | Sweet, slightly tart | Warm to moderate | One of the most popular British plums |
| Elephant Heart | Rich, sweet | Warm | Large size, heart-shaped, dark red skin |
Choosing a plum variety to grow is part of the fun, and I recommend trying a few different types to see which one you like best. After all, variety is what makes life interesting, and the same applies to growing plums. Just remember to consider your local climate and growing conditions when deciding on the variety, as this can significantly impact the success of your plum-growing endeavor.
In Conclusion
Growing a plum tree from a seed is a journey that spans years. But the rewards, both tangible and intangible, are immense. Not only will you have a tree that provides shade and fruit, but you will also have a story to tell, a connection with nature, and the satisfaction of watching life unfold from a tiny seed.
So, I encourage you to give it a try. The journey is well worth it, and I promise, that first bite into a plum from your own tree is an experience you’ll never forget.
Happy gardening!